Sunday, December 13, 2009
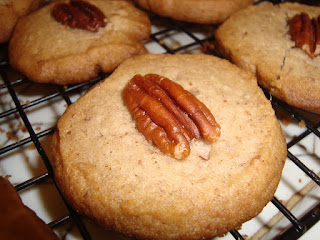
Pecan Sandies
Ingredients
1 1/2 cups pecan halves, plus about 32 pecan halves for pressing onto unbaked cookies
1/4 cup confectioner's sugar
1/2 cup packed light brown sugar
1 1/2 cups unbleached all-purpose flour
1/4 teaspoon salt
12 tablespoons (1 1/2 sticks) cold unsalted butter cut into 1/2 inch cubes
1 large egg yolk
Instructions
1) In a food processor, process 1 1/2 cups pecans with both sugars until nuts are ground, about twenty 1 second pulses. Add the flour and salt and process to combine, about twelve 1 second pulses. Scatter the butter pieces over the dry ingredients and process until the mixture resembles damp sand and rides up the sides of the bowl, about eighteen 1 second pulses. With the machine running, add the yolk and process until the dough comes together into a rough ball, about 20 seconds.
2. Turn the dough (it will look scrappy and uneven) onto a clean, dry work surface and gently knead until it is evenly moistened and cohesive. Using the palms of your hands, roll the dough into an even 12-inch log, cut the log in half with a chef's knife, and wrap each half in plastic wrap. Freeze the dough logs until very cold but still malleable, about 30 minutes. Remove them from the freezer, unwrap them, and toll them on the work surface to round off the flat sides. Rewrap the logs in plastic wrap and refrigerate them until thoroughly chilled and completely firm, about 2 hours.
3. Adjust the oven racks to the upper- and lower-middle positions and heat the oven to 325 degrees. Line 2 large baking sheets with parchment paper or spray them with nonstick cooking spray. Unwrap the dough logs and using a sharp chef's knife, slice the logs into coins 1/4 inch thick, slightly rotating the logs after each slice so that they do not develop a markedly flat slide. Place t slices on the prepared baking sheets, spacing them about 3/4 inch apart. Press a pecan half in the center of each slice.
4. Bake until the edges of the cookies are golden brown, about 24 minutes, rotating the baking sheets front to back and top to bottom halfway through the baking time. Cool the cookies 3 minutes on the baking sheets, then transfer them to a wire rack with a wide metal spatula and let cool to room temperature.
People have made some comments to me that I always make mistakes while baking. This isn't necessarily true...but I am very open and honest with you guys about things I could do to improve in both efficiency of the recipe and taste. I love finding ways to improve myself and my baking. So if you have any comments on the above things, please let me know. This being said....I will begin my critique of this recipe.
The recipe calls for basically the whole recipe to be made in the food processor. Now, I love my new food processor/baby but it wasn't big enough to hold all of the dough for the recipe. I discovered this as I made the recipe. I had to take out dough and place it in a separate bowl and mix the remaining dough in the food processor. Then, I exchanged the unmixed dough for mixed dough in the processor and repeated the process until everything was mixed. If I had not had trouble with the size of my food processor, the dough would have actually been created within 10 minutes... yes the recipe is that easy!
Overall, I give these cookies 4 out of 5 stars. You have to like shortbread to like these cookies but they turned out quite good. Not too sweet, not to crisp. They crumble in your fingers as you eat them, but melt in your mouth. I will definitely make them again.
Saturday, December 12, 2009
Macadamia Butter Cookies
Ingredients
2/3 cup macadamia nuts
1/2 cup granulated sugar
1/2 cup packed light brown sugar
1 teaspoon vanilla extract
1 large egg
1 1/4 cups all-purpose flour
1/2 teaspoon baking soda
1/4 teaspoon salt
1/8 teaspoon ground nutmeg
1/2 cup sweetened dried cranberries, chopped
1 tablespoon granulated sugar
Directions:
1. Preheat oven to 375 F.
2. Place nuts in a food processor; process until smooth (about 2 minutes), scraping sides of bowl once. Combine macadamia butter, 1/2 cup granulated sugar and brown sugar in a large bowl; beat with a mixer at medium speed. Add vanilla and egg, beat well.
3. Weigh or lightly spoon flour into dry measuring cups; level with a knife. Combine flour, baking soda, salt and nutmeg, stirring with a whisk. Add flour mixture to sugar mixture; beat at low speed just until combine. Stir in cranberries. Chill 10 minutes.
4. Divide chilled dough into 30 equal portions; roll each portion into a ball. Place 1 tablespoon granulated sugar in a small bowl. Lightly press each ball into sugar; place each ball, sugar side up, on a baking sheet covered with parchment paper. Gently press the top of each cookie with a fork. Place 15 cookies on each of 2 baking sheets.
5. Bake cookies, 1 baking sheet at a time, at 375 F for 9 minutes or until golden. Remove cookies from pan, cool on a wire rack. Repeat procedure with remaining cookies.
Recipe is from December 2009 Cooking Light
I love the Cookie Exchange. It is so much fun...getting recipes from other people's cookies and coming home with a box of cookies. How fun is that, right?
Anyways, I made this recipe with my brand new food processor. Woo Hoo! No more grinding nuts with my coffee grinder. I am moving up in the world. :) I specifically choose this recipe so that I would have the opportunity to grind. I wish my food processor was a bit larger for this recipe but it was sufficient especially when you compare it to no food processor at all. Overall, I enjoyed these cookies. You have to like macadamia nuts...really like macadamia nuts to like them. The cranberries are a nice addition to them as well. I give these cookies 3.75 out of 5 stars. I wish they were softer and easier to to break apart. They were a bit crunchy and I wish I could bend them apart instead of crack them apart. I will definitely consider making these cookies again. I am not sure what I can do to improve them. Any suggestions?
Thursday, December 10, 2009
Sour Cream Fudge Layer Cake
Sour Cream Fudge Cake
1 1/4 cups unbleached all purpose flour
1 cup non-alkalized cocoa
2 teaspoons instant espresso or coffee powder
1 cup boiling water
1/2 cup sour cream
2 teaspoons vanilla extract
16 tablespoons (2 sticks) unsalted butter, softened
1 3/4 cups sugar
2 large eggs, at room temperature
3/4 teaspoon baking soda
1/2 teaspoon salt
Chocolate Butter Icing
9 ounces bittersweet or semisweet chocolate, chopped
8 tablespoons (1 stick) unsalted butter
1/3 cup light corn syrup
1. For the cake: Adjust an oven rack to the middle position and heat the oven to 350. Generously grease two 9-inch round cake pans and cover the plan bottoms with rounds of parchment paper or waxed paper. Grease the parchment rounds and dust the pan with flour, tapping out the excess.
2. Mix the cocoa and instant expresso powder in a small bowl; add the boiling water and mix until smooth. Cool to room temperature, then stir in the sour cream and vanilla.
3. Beat the butter in the bowl of a standing mixer at medium speed until smooth and shiny, about 30 seconds. Gradually sprinkle in the sugar; beat until the mixture is fluffy and almost white, 3 to 5 minutes. Add the eggs 1 at a time, beating 1 full minute after each addition.
4. Whisk the flour, baking soda, and salt in a medium bowl. With the mixer at the lowest speed, add about a third of the dry ingredients to the batter, followed immediately by about a third of the cocoa mixture; mix until the ingredients are almost incorporated into the batter. Repeat the process twice more. When the batter appears blended, stop the mixer and scrape the sides of the bowl with a rubber spatula. Return the mixer to low speed; beat until the batter looks satiny, about 15 seconds longer.
5. Divide the batter evenly between the pans. With a rubber spatula, spread the batter to the pan sides and smooth the tops. Bake the cakes until they feel firm in the center when lightly pressed and a toothpick or thin skewer comes out clean or with just a crumb or two adhering, 23 to 30 minutes. Transfer pans to wire racks; cool for 10 minutes. Run a knife around the perimeter of each pan, invert the cakes onto the racks, and peel off the paper liners. Reinvert the cakes onto additional racks; cool completely before frosting.
6. For the icing: Melt the chocolate and butter in a medium bowl set over a pan of almost simmering water. Stir in the corn syrup. Set the bowl of chocolate mixture over a larger bowl of ice water, stirring occasionally, until the icing is just thick enough to spread.
So I am not going to lie, I had trouble making this cake. I tried twice. Now the cake seemed to be going great each time. I had no trouble mixing it and placing it in my awesome William Sonoma Cake pans. Everything seemed to be going great. Then as I baked it, it sank some. Then the real problem came when it was time to flip it. What a disaster! However, the cake did taste good. Next time, I think I will make this cake a sheet cake. I give this cake 3.5 out 5 stars....merely because of my inability to flip it.
Sunday, November 29, 2009
Chicken Parmigiana
These past couple of days I spent at home in San Antonio with my family celebrating Thanksgiving. Yesterday, after eating excellent food prepared by my mom for a couple of days, I decided to cook for her. She deserved a break in my humble opinion. Thanksgiving is a stressful holiday. Plus, I haven't cooked much this past month with the extensive traveling for residency interviews. So I was missing the kitchen a little in a sense. I picked out this recipe from the Pioneer Woman's website. I know this is the second recipe that I have made by her this month, but it was all I could think of to make at the last minute. Plus, I had ready access to the recipe on my iPhone at the grocery store.
Ingredients
- 4 whole (up To 6) Boneless, Skinless Chicken Breasts, Trimmed And Pounded Flat
- ½ cups All-purpose Flour
- Salt And Pepper (to Taste)
- ½ cups Olive Oil
- 2 Tablespoons Butter
- 1 whole Medium Onion, Chopped
- 4 cloves Garlic, Minced
- ¾ cups Wine (white Or Red Is Fine)
- 3 cans (14.5 Oz.) Crushed Tomatoes
- 2 Tablespoons Sugar
- ¼ cubes Chopped Fresh Parsley
- 1 cup Freshly Grated Parmesan Cheese
- 1 pound Thin Linguine
Instructions
1. Mix flour, salt, and pepper together on a large plate.
Dredge flattened chicken breasts in flour mixture. Set aside.
2. At this time, you can start a pot of water for your pasta. Cook linguine until al dente.
3. Heat olive oil and butter together in a large skillet over medium heat. When butter is melted and oil/butter mixture is hot, fry chicken breasts until nice and golden brown on each side, about 2 to 3 minutes per side.
Remove chicken breasts from the skillet and keep warm.
4. Without cleaning skillet, add onions and garlic and gently stir for 2 minutes. Pour in wine and scrape the bottom of the pan, getting all the flavorful bits off the bottom. Allow wine to cook down until reduced by half, about 2 minutes.
Pour in crushed tomatoes and stir to combine. Add sugar and more salt and pepper to taste. Allow to cook for 30 minutes. Toward the end of cooking time, add chopped parsley and give sauce a final stir.
5. Carefully lay chicken breasts on top of the sauce and completely cover them in grated Parmesan. Place lid on skillet and reduce heat to low. Allow to simmer until cheese is melted and chicken is thoroughly heated. Add more cheese to taste.
6. Place cooked noodles on a plate and cover with sauce. Place chicken breast on top and sprinkle with more parsley. Serve immediately.
From: http://thepioneerwoman.com/cooking/2009/10/chicken-parmigiana/
I served this dish with salad and bread. I give it 3.5 out of 5 stars. My problems with this recipe start with the fact that the directions indicate to start the pasta in the second step. If I were to do this recipe over again, I would start the chicken and sauce earlier and then start the pasta while the sauce is cooking. Second, the chicken was good, but I feel like I could do better. The chicken needs to be breaded differently somehow to give it a crisper crust. I love the wine in the red sauce. It gives the sauce a nice little zing. I used left over cab. sav. from thanksgiving. The only change to the sauce was that I added basil...I thought it needed it.
Sunday, November 22, 2009
Cinnamon Rolls
Dough
1 quart whole milk
1 cup vegetable oil
1 cup sugar
2 packages (4 1/2 teaspoons) active dry yeast
9 cups all-purpose flour
1 heaping teaspoon baking powder
1 scant teaspoon baking soda
1 tablespoon salt
Filling
2 cups melted butter, plus more as needed
1/4 cup ground cinnamon for sprinkling
2 cups sugar, plus more as needed
Maple Icing
2 pounds powdered sugar
1/2 cup whole milk
6 tablespoons (3/4 stick) butter, melted
1/4 cup strongly brewed coffee
Dash of salt
1 tablespoon maple flavoring or maple extract
1. For the dough, heat the milk, vegetable oil, and sugar in a medium saucepan over medium heat; do not allow the mixture to boil. Set aside and cool to lukewarm.
2. Sprinkle the yeast on top and let it sit on the milk for 1 minute.
3. Add 8 cups of flour. Stir until just combined, cover with a clean kitchen towel, and set aside in a relatively warm place for 1 hour.
4. Remove the towel and add the baking powder, baking soda, salt, and the remaining 1 cup flour. Stir thoroughly to combine. Use the dough right away or place in a mixing bowl and refrigerate for up to 3 days, punching down the dough if it rises to the top of the bowl.
5. To assemble the rolls, remove half the dough from the pan. On a floured baking surface, roll the dough into a large rectangle.
6. To make the filling, pour 1 cup of the melted butter over the surface of the dough. Use your fingers to spread the butter evenly.
7. Generously sprinkle half the ground cinnamon and 1 cup of sugar over the butter. Don't be afraid to drizzle on more butter or more sugar!
8. No, beginning at the end farthest from you, roll the rectangle tightly toward you. Use both hands and work slowly, being careful to keep the roll tight.
9. When you reach the end, pinch the seam together.
10. Transfer to a cutting board and with a sharp knife, make 1 1/2 inch slices. One log will produce 20 to 25 rolls.
11. Pour a couple of tablespoons of melted butter into the desired pie pans or baking dishes and swirl to coat.
12. Place the sliced rolls in the pans, being careful not to overcrowd.
13. Repeat the rolling/sugar/butter process with the other half of the dough and more pans. Preheat the oven to 375F. Cover the pans with a kitchen towel and set aside to rise on the countertop for at least 20 minutes before baking. Remove the towel and bake for 13 to 17 minutes, until golden brown. Don't allow rolls to become overly brown.
14. In a large bowl, whisk together the powdered sugar, milk, butter, coffee, and salt.
15. Splash in the maple flavoring.
16. Whisk until very smooth. Taste and add in more maple, sugar, butter, or other ingredients as needed until the icing reaches the desired consistency. The icing should be thick but still pourable.
17. While the rolls are still warm, generously drizzle icing over the top.
18. As they sit, the rolls will absorb some of the icing's moisture and flavor.
Making these cinnamon rolls became quite the adventure. Maybe not in a good way. I have been interviewing a lot this month and this past week I was in New Mexico. Before I left for New Mexico, I bought all of the ingredients, or so I thought, for this recipe. I got back from interviewing late Saturday night and the brunch was on the next morning. So I started to make the cinnamon rolls. When I opened up the flour for the dough portion of the recipe, I discovered my flour had those little pill bugs in it. Gross, right? So I threw out the flour and went to the HEB to buy more. I bought more flour...returned home....only to discover that I had no butter after I had rolled out the dough. I always have butter. Infuriated now, I returned to HEB for butter. Tonight, just wasn't my night. What can I say? I returned home to finish rolling out the cinnamon rolls near midnight. I discovered that the first batch I rolled that I did not roll tight enough. So if you make this recipe, do be scared to roll the dough tight! You live, you learn. Cutting the rolls was also a chore with them deciding to unroll themselves. Anyways, I stored the rolls in the refrigerator overnight to be made in the AM right before the brunch.
The next morning making the rolls went smoothly. No problems. Whew! I give these rolls 4 out of 5 stars. They were sinful and good! I was concerned for my arteries. Next time I make them, I will make sure I have all of the proper ingredients for one. Then I will also use floss to cut the rolls. I have heard that this is easier than using a knife. Lastly, I would use maybe a little less of the delish maple icing. The icing covered some of the taste of the cinnamon in the rolls. Overall though, the rolls were a success despite my lack of organization. Thanks Pioneer Woman!
Wednesday, November 4, 2009
Apple Crumb Pie
Apple Crumb Pie (pg. 237 of Martha Stewart's Baking Handbook)
Ingredients
Almond Crumb Crust (recipe follows)
3 1/2 pounds assorted apples (such as Macoun, Cortland, Jonagold, Empire or Rome), peeled, cored and cut into 1/4 inch-thick slices
~about 2 tablespoons lemon juice
1/3 cup sugar
3/4 teaspoon ground cinnamon
1/4 teaspoon freshly grated nutmeg
1/4 teaspoon salt
2 tablespoons unsalted butter, cut into small pieces
Directions
1) Preheat the oven to 35oF. Evenly and firmly press a little more than half of the crumbs (about 2 1/2 cups) into the bottom, up the sides, and onto the rim of a 9-inch glass pie plate. Press firmly into the edges. Freeze pie shell until firm, about 15 minutes.
2) In a large bowl, toss together apples, lemon juice, sugar, cinnamon, nutmeg, and salt. Pour mixture into the chilled pie shell, mounding apples slightly in the center. Dot with butter. Sprinkle the remaining crumbs in clumps over the apples to cover completely.
3) Bake, rotating halfway through, until the crust turns golden and the juices begin to bubble, about 1 hour. Transfer to a wire rack completely. The pie can be kept at room temperature, loosely covered with plastic wrap, for up to 2 days.
Almond Crumb Crust
Ingredients
1 1/2 cups all-purpose flour
1 cup plus 2 tablespoons blanched almonds, finely ground
1/2 cup plus 2 tablespoons sugar
1/4 teaspoon salt
1 1/2 sticks unsalted butter, room temperature, cut into small pieces
Directions
1) In a large bowl, whisk together the flour, almonds, sugar and salt. Using a pastry blender, cut in the butter until the mixture resembles coarse crumbs with a few larger clumps remaining. Using your fingers, squeeze the mixture together to create pea-size to 3/4-inch pieces. If not using right away, cover and chill until ready to proceed.
This pie was AWESOME. I give it 5 out of 5 stars. It was super easy to make. The crust did not require a wooden rolling pin. Instead, you could just press down the crust with your fingers. In turn, this saved a lot of time. The inside of the pie at first was a little watery, but this was because I was so excited to eat the pie that I did not let it cool. After letting the pie cool, the sugars coalesced and the pie's contents solidified. (No more water here!) The pie was super delish and you should make it too. If not for my seal of approval, but simply because it was the easiest apple pie ever and Martha does not mess around when it comes to baking.
Friday, October 30, 2009
Soft & Chewy Chocolate Drops
Ingredients
4 ounces unsweetened chocolate
3/4 cup butter
2 cups sugar
3 eggs
1 tsp vanilla
2- 1/2 cups flour
1 tub (8 oz) Cool WHIP Whipped topping
6 ounces semi-sweet chocolate
Directions
1) Heat oven to 350 F. Microwave unsweetened chocolate and butter in large microwavable bowl on HIGH 2 minutes or until butter is melted. Stir until chocolate is completely melted. Add sugar; mix well. Blend in eggs and vanilla. Stir in flour. (Do not overmix) Refrigerate 1 hour or until dough is easy to handle.
2) Shape into 1 inch balls; place, 2 inches apart, on lightly greased baking sheets.
3) Bake 8 minutes or just until set. (Do not overbake) Let stand on baking sheet 1 minute; transfer to wire racks. Cool completely.
4) Microwave Cool Whip and semi-sweet chocolate in microwaveable bowl on high 1-1/2 minutes or until chocolate is completely melted, stirring after 1 minute. Let stand 15 minutes to thicken. Spread over cookies, let stand until firm.
From Baker's Unsweetened Baking Chocolate Squares Box
These cookies were descent but nothing special. I give them 2 out of 5 stars. I probably will not make them again. The frosting is slightly bitter and the cookies were not as soft as I wanted. The cookies themselves were difficult to discern when they were done. Hence this may be the reason why they were not as soft as I would have liked them to be.
Thursday, October 22, 2009
Chocolate Pecan Pie
This Recipe is from: Tori's Mom
Ingredients
1 unbaked 9-inch pie crust shell
3 eggs
1 cup sugar
1 cup light corn syrup
1/4 cup butter, melted
2 oz unsweetened baking chocolate, melted
1 tsp vanilla
1 cup large pecan pieces
Directions
Preheat oven to 400 F. Beat eggs in a large bowl; stir in sugar, corn syrup, combined melted butter, chocolate, and vanilla. Mix thoroughly, but do not overbeat. Sprinkle pecans in prepared shell; slowly pour filling mixture over pecans. Bake for 15 minutes. Lower heat to 325 and continue to bake until filling is puffed and set, about 45-50 minutes.
As I stared at the oven at the end of this recipe, I had a difficult time ascertaining when the pie was done. The pie puffed up at 40 minutes when I glanced at it, but I wasn't sure whether it was set. I took the pie out and placed my finger in the center and decided that it wasn't yet done and placed it back in the oven for another 8 minutes. At the end of the recipe, I still wasn't quite sure whether it was set but decided that it had to be done. I really liked this recipe. It was incredibly easy to make. It made me wonder why I don't make pies more often. Cookies are harder. I give this recipe 4.5 out of 5 stars. I will definitely make it again.
Monday, October 19, 2009
Tunnel of Fudge Cake
Cake
1 3/4 cups sugar
1 3/4 cups butter
6 eggs
2 cups powdered sugar
2 1/4 cups unbleached flour
3/4 cup unsweetened cocoa
2 cups chopped walnuts
Glaze
3/4 cup powdered sugar
1/4 cup unsweetened cocoa
4 to 6 teaspoons milk
1. Heat oven to 350°F. Grease and flour 12-cup fluted tube cake pan or 10-inch tube pan. In large bowl, combine sugar and margarine; beat until light and fluffy. Add eggs 1 at a time, beating well after each addition. Gradually add 2 cups powdered sugar; blend well. By hand, stir in flour and remaining cake ingredients until well blended. Spoon batter into greased and floured pan; spread evenly. | |
2. Bake at 350°F. for 45 to 50 minutes or until top is set and edges are beginning to pull away from sides of pan.** Cool upright in pan on wire rack 1 1/2 hours. Invert onto serving plate; cool at least 2 hours. | |
3. In small bowl, combine all glaze ingredients, adding enough milk for desired drizzling consistency. Spoon over top of cake, allowing some to run down sides. Store tightly covered. Before you run out to make this recipe, I want to emphasize that it is not health food. 1 3/4 cups butter= wow!! The cake is mighty tasty. I give it 3.75 out of 5 stars. The tunnel of fudge turned out...to my own surprise. My favorite part of this cake is the tunnel. It is under-baked goodness. 3.75 stars though for the cake being too rich and too heavy and a little too dry. Overall, I have made better chocolate cakes, but this one is pretty darn good. |
Friday, October 16, 2009
Angel Food Cake
Ingredients:
12 cold large eggs
1 cup cake flour
1 3/4 granulated sugar
1/4 teaspoon salt
2 teaspoons vanilla extract
1/2 teaspoon almond extract
Directions:
1. Preheat the oven and prepare the pan
Position a rack in the lower middle of the oven, so the cake will be evenly surrounded with heat and preheat to 325 F. Have ready a 10 inch tube pan, preferably with a removable bottom and small feet spaced evenly around the rim. If the pan does not have feet, have a narrow necked full wine bottle or similar bottle over which the tube pan can be slipped with it is cooling. You won't need to grease the pan as you do with most other cakes because any fat, such as butter, can deflate the delicate batter. The batter needs to adhere to the pan and climb the sides while it bakes.
2. Separate the eggs
Take the eggs from the refrigerator. Have ready 2 medium bowls and 1 large mixing bowl. The bowls must be perfectly clean, because even a speck of fat can prevent the whites from reaching the necessary loft when whipped. Working over the first medium bowl, crack 1 egg and pass the yolk back and forth between the shell halves, allowing the white to drop into the bowl. Drop the yolk into the second medium bowl. Transfer the white to the large bowl. Repeat with the remaining 11 eggs/ Reserve the yolks for another use.
3. Sift the dry ingredients
Suspend a fine mesh sieve over a small bowl and add the flour and 3/4 cup of sugar. Lightly tap the rim of the sieve to encourage the ingredients to pass into the bowl. This both combines the ingredients and aerates the flour. Set aside.
4. Beat the egg whites with the cream of tarter
Add the cream of tartar and slat to the bowl with the egg whites. Fit a stand mixer or a handheld mixer with the whip attachment. Beat on medium speed until opaque white and foamy and cream of tartar has dissolved, about 1 minute.
5. Beat the egg white mixture to stiff peaks
Increase the speed to medium-high and continue beating, moving the whip around the bowl if using the handheld mixer, until the whites look white, shiny and smooth and the movement of the whip forms lines in the mixture 2-3 minutes. Stop the mixture and lift the whip. The peaks of the whites should be slightly bent; these are soft peaks. Turn the mixer on medium speed and beat in the remaining 1 cup sugar, at a rate of about 2 tablespoons every 15 seconds, until all the sugar is incorporated. (Remember to move the whip around in the bowl if using a handheld mixer.) The egg whites will be shiny. Stop the mixer and lift the whip. The peaks of the whites should be firm and straight; these are stiff peaks. Add the vanilla and almond extracts and beat on medium speed for 1 minute.
6. Mix in the dry ingredients
Reduce the mixer speed to low. Add 1/2 cup of the flour mixture and beat just until incorporated and no streaks are visible. Repeat with the remaining flour mixture in 1/2 cup additions. When all of the flour mixture has been incorporated, the batter will look soft and fluffy
7. Transfer the batter to the pan
Using a large rubber spatula, scrape the batter into the prepared pan, then use the spatula to smooth the top. You want to eliminate any large bumps and distribute the batter evenly, but the top does not need to be perfectly smooth.
8. Bake the cake
Bake the cake undisturbed for 40 minutes. If the top looks set-that is the batter no longer looks wet and the top is lightly browned, touch it gently. If it feels firm, insert a thin skewer or toothpick near the center of the cake, equidistant from the pan sides and the tube. If it comes out dry the cake is done. If it comes out wet, set the timer for another 5 minutes and continue to bake. Repeat the process until the cake is done---which will probably take a total of 50 minutes.
Overall, I give this cake 4 out of 5 stars. The taste was good. However, in the midst of cooling, the cake deflated somewhat. Therefore the cake was denser tasting than a typical Angel Food Cake that tastes somewhat light and fluffy. I think that next time I should use an Angel Food style pan instead of the silicone bundt cake pan that I used. The change in pan may help during the cooling process from inhibiting the deflation of the cake.
Monday, October 12, 2009
Anise-Almond Biscotti
Ingredients
1 1/2 cups unblanched almonds
2 1/2 cups all-purpose flour, plus more for dusting
1/2 cup yellow cornmeal
2 tablespoons baking powder
1/2 teaspoon salt
4 tablespoons unsalted butter, room temperature
1 cup granulated sugar
1 teaspoon pure anise extract
3 large eggs, plus 1 large egg, lightly beaten
1 tablespoon anise seeds
Directions
2) In the bowl of an electric mixer fitted with the paddle attachment, beat the butter and granulated sugar on medium-high speed until light and fluffy, about 3 minutes. Beat in the anise extract. Add 3 eggs, one at a time, beating to incorporate after each addition and scraping down the sides of the bowl as needed. Add the flour mixture, and beat on low speed until combined. Mix in anise seeds and toasted almonds.
3) Turn out the dough onto a lightly floured surface and knead to evenly distribute the nuts and seeds. Divide in half. Shape each piece into a 18-inch log, and transfer to the prepared baking sheet, about 3 inches apart. Brush beaten egg over the surface of the logs, and sprinkle generously with sanding sugar, if using.
4) Bake, rotating pan halfway through, until logs are lightly browned and firm to the touch, about 30 minutes. Transfer parchment and logs to a wire rack to cool slightly, about 20 minutes. Reduce oven temperature to 300 F.
5) Place logs on a cutting board. Using a serrated knife, cut the logs crosswise on the diagonal into 1/2-inch-thick slices. Place a wire rack on a rimmed baking sheet. Arrange slices cut side down on the rack. Bake until firm to the touch, about 30 minutes. Remove pan from oven; let biscotti cool completely on the rack. Biscotti can be kept in an airtight container at room temperature for up to 1 week.
***Note I did not add anise seeds or sanding sugar to the recipe
I give this recipe 5 out of 5 stars. I will definitely be making these again! The biscotti had an excellent consistency and wasn't too hard. Definitely a perfect companion for a cup of coffee.
Monday, October 5, 2009
White Chocolate Peach Cake
Ingredients for the cake:
Solid vegetable shortening for greasing the pans
Flour for dusting the pans
8 larges fresh peaches
1/4 cup sugar
6 ounces white chocolate, coarsely chopped
1 package (18.25 ounces) plain white cake mix
1/3 cup vegetable oil
3 large eggs
2 large egg whites
Fresh Peach Buttercream Frosting
Directions for the cake:
1) Place a rack in the center of the oven and preheat the oven to 350 F. Generously grease two 9-inch round cake pans with solid vegetable shortening, then dust with flour. Shake out the excess flour. Set the pans aside.
2) Peel, pit, and slice 4 of the peaches. Place the peach slices in a small glass bowl, add the sugar, and toss to coat the slices well. Cover the bowl with plastic wrap and chill.
3) Peel, pit and quarter the remaining 4 peaches. Place the peach quarters in a food processor and process until pureed. You should have about 1 1/4 cups. Pour 1/4 cup of the puree into a small glass bowl, cover with plastic wrap, and reserve in the refrigerator. Pour 1 cup of the puree into a large mixing bowl. Set aside.
4) melt the white chocolate in a small saucepan over low heat, stirring constantly 3 to 4 minutes. Or microwave the white chocolate in a small glass bowl on high power for 1 minute, then stir with a small rubber spatula until smooth.
5) Place the cake mix, oil, whole eggs, and egg whites in the mixing bowl with the peach puree. Pour in the slightly cooled white chocolate. Blend with an electric mixer on low speed for 1 minute. Stop the machine and scrape down the sides of the bowl with a rubber spatula. Increase the mixer speed to medium and beat 2 minutes more, scraping down the sides again if needed. The batter should look well combined. Divide the batter evenly between the prepared pans, smoothing it out with the rubber spatula. Place the pans in the oven side by side.
6) Bake the cakes until they are golden brown and spring back lightly pressed with your finger, 30 to 33 minutes. Remove the pans from the oven and place them on wire racks to cool for 10 minutes. Run a dinner knife around the edge of each layer and invert each onto a rack, then invert again on another rack so the cakes are right side up. Allow to cool completely, 30 minutes more.
7) Meanwhile, prepare the Fresh Peach Buttercream Frosting.
8) Place on cake layer, right side up, on a serving platter. Spread the top with frosting. Place the second layer, right side up on top of the first layer and frost.
9) Slice and serve cake, topped with sweetened peaches.
Fresh Peach Buttercream Frosting
8 tablespoons (1 stick) butter, at room temperature
3 3/4 cups confectioners' sugar, sifted
3 to 4 tablespoons pureed fresh or thawed frozen peaches
1/2 teaspoon pure vanilla extract
1. Place the butter in a large mixing bowl. Blend with an electric mixer on low speed until fluffy, 30 seconds. Stop the machine and add the confectioners' sugar, 3 tablespoons peach puree, and vanilla. Blend with the mixer on low speed until the sugar is incorporate, 1 minute. Increase the speed to medium and beat until light and fluffy, 1 minute more. Blend in another tablespoon peach puree if the frosting seems to stiff.
2. Use to frost the top and sides of the cake of choice.
Okay...time to evaluate. My first impression is that this cake tastes really good. It is moist and the frosting is melt in your mouth buttery. My second thought is wait.... what's the name of the cake again? ....White Chocolate Peach Where's the peach my friend, where's the peach? I can't really taste it. I recall watching my friend peel the peaches and putting them in the blender to puree. I remember then putting the pureed peaches in the frosting and cake batter, but the peach taste just isn't there. I also don't really taste the white chocolate. The flavors are too subtle in my opinion. The cake still reminds me quite a bit of the original white box cake. Don't get me wrong. The cake still tastes good. Good enough to get 3.5 out of 5 stars in my book in fact. The frosting is to die for and I probably would use this frosting on a non peach cake in the future. The consistency was excellent for spreading. I guess the peach made it easier to spread. However, all of this being said, next time I make this cake I will use more peach and more white chocolate in the cake itself. My overall disappointment and lower rating of this cake is mainly substantiated upon the fact that the cake doesn't live up to its name.
Saturday, October 3, 2009
Apple Cake
1. Preheat the oven and prepare the pan
Position a rack in the lower middle of the oven, so the cake will be evenly surrounded with heat, and preheat to 350 F. Butter a 10 inch fixed-bottom tube pan and sprinkle it lightly with flour, then tap out the extra flour.
2. Make the cinnamon sugar
In a small bowl, stir together the sugar and the cinnamon until no white streaks of sugar are visible. Set aside.
3. Sift the dry ingredients
Suspend a fine-mesh sieve over a small bowl and add the flour, baking powder, baking soda, and salt. Lightly tap the rim of the sieve to encourage the ingredients to pass into the bowl. This both combines the ingredients and aerates the flour. Set the bowl aside.
4. Peel and shred the apples
Using a vegetable peeler, remove the skin from each apple. Using a box grater-shredder held over a sheet of waxed paper, repeatedly draw one side of a peeled apple against the large shredding holes. Stop shredding when you reach a peeled apple against the large shredding holes. Stop shredding when you reach the core and seeds, rotate the apple to another side, and shred again. Continue rotating and shredding until only the core is left. Spoon the shredded apple into a glass measuring cup. Shred the remaining apple in the same way until you have 2 cups. Transfer the shredded apples to a small bowl, and stir in about half of the cinnamon sugar. Set aside for 15 minutes to let the apples absorb the flavor. As the shredded apples stand, their juices will slowly released into the bowl.
5. Drain the apples
Suspend a fine-mesh sieve over a bowl and pour the apple mixture into it. Do not press on the apple, but let any juice drain off into the bowl. (Draining the apples prevents excessive moisture from being added to the batter, which could cause the cake to fail to rise properly when baked.) Discard the juice and set the shredded apples aside.
6. Beat the eggs with the sugar
In a large mixing bowl or the bowl of a stand mixer, combine the eggs and the sugar. Fit the handheld mixer with the twin beater or the stand mixer with the paddle attachment. Beat the mixture on medium-high speed until it thickens and the color lightens slightly, about 2 minutes. If using a handheld mixer, move the beaters around in the bowl to make sure every bit is well beaten. Stop the mixer occasionally and use a rubber spatula to scrape down any batter from the sides of the bowl into the remaining ingredients.
7. Finish the batter
Reduce the speed to low and beat in the vanilla extract. Slowly pour in the oil, mixing just until it is blended into the batter, about 1 minute. Do not add the oil too quickly, or it might splash out of the bowl. Add the dry ingredients in 2 equals additions, and beat after each addition just until incorporated. Add the sour cream and continue mixing just until no white streaks remain. Finally, add the shredded apples and mix just until evenly distributed throughout the batter. The batter will thin slightly when the apples are added.
8. Bake the cake
Pour about two-thirds of the batter into the prepared pan, turning the pan as your pour so the batter fills it evenly. Sprinkle half of the remaining cinnamon sugar evenly over the batter in the pan (this will form an interesting swirl in the middle of each cake slice). Pour the remaining batter over the cinnamon sugar, using the spatula to scrape out every last bit from the bowl. The batter may not cover the cinnamon sugar completely. Sprinkle the remaining cinnamon sugar evenly over the top. Bake undisturbed for 50 minutes. If the cake looks set--that is, the batter no longer looks liquid and the top is lightly browned--touch the top gently. If it feels firm, insert a thin skewer or toothpick in the center. If it comes out dry, the cake is done. If it comes out wet or with crumbs clinging to it, set the timer for another 5 minutes, continue to bake, and check again. Repeat this process until the cake is done. It will probably take no longer than 1 hour.
9. Let the cake cool
Using pot holders, carefully transfer the cake to a wire rack. Let cool in the pan for 20 minutes. Run a thin knife along the inside edge of the pan and the tube to loosen the cake, keeping the knife pressed against the pan sides. Invert a plate on top of the cake and invert together. The cake will release from the pan. Lift off the pan. Invert another wire rack on the cake and invert the racks together so the cake is top side up. Lift off the top rack. Let the cake cool completely on the rack, about 1 1/2 hours.
10. Serve or store the cake
Carefully slide the cake onto a serving plate. Using a serrated knife and a light sawing motion, cut the cake into 12-16 wedges. Or, tightly wrap the cooled cake with plastic wrap and store at room temperature for up to 4 days.
I give this cake 4.5 out of 5 stars. I think it tastes better than the apple cake I used to make in college. Keep in mind though that they are two different beasts. The apples are not found when eating this cake...they are literally baked in because they are shredded. The shredded apples make the cake quite moist and the cinnamon sugar layer is a delightful surprise. I plan on using the technique of placing cinnamon sugar between the batter to create a pattern in future recipes. It is a neat technique that I have never imagined doing before.
My difficulties with recipe arose when I was trying to decide when the cake was done. I do not have the aforementioned cake pan. Therefore, I had to make do with my silicone bundt cake pan. The cake almost was too much for this pan and I had to cook the cake 15 minutes longer than the recipe called for. I was worried throughout this time that I was overcooking the cake. (Nothing is worse than dry overdone cake) My dilemma may have been enhanced because I baked the cake at 325 instead of 350. However, I don't think this accounts for 15 extra minutes of baking!! I often bake cakes at a lower temperature though because cakes turn out more moist this way. Anyways, my summary to all of this is you should make this cake. It is awesome. : )
Tuesday, September 22, 2009
Orange Marmalade Loaf
Ingredients
4 cups white bread flour, plus extra for dusting
1 1/2 tsp salt
1 1/2 tsp superfine sugar
1 1/2 tsp active dry yeast
2/3 cup lukewarm water
2/3 cup lukewarm milk
2 tbsp vegetable oil, plus extra for brushing
7 tbsp orange marmalade
Topping
1 egg yolk
1 tbsp milk
1 tbsp superfine sugar
1-2 tbsp candied orange peel
Directions (Makes 1 loaf)
1) Sift the flour and salt together into a bowl and stir in the sugar and yeast. Make a well in the center and pour in the lukewarm water and milk. Stir well with a wooden spoon until the dough begins to come together, then knead with your hands for about 10 minutes, until smooth and elastic.
2) Brush a bowl with oil. Shape the dough into a ball, put it into the bowl, and put the bowl into a plastic bag or cover with a damp dish towel. Let rise in a warm place for 1-2 hours, until the dough has doubled in volume.
3) Brush a 7.5 x 4.5 x 3.5 inch or 19 x12 x 9 cm loaf pan with oil. Turn out the dough onto a lightly floured counter and punch down with your fist. Roll out to a rectangle about 3/4 inch thick. Spread the marmalade evenly over the dough leaving a 1/2 inch border along one long side. Roll up the dough like a jelly roll and put it into the prepared pan, seam side down. Put the pan in a plastic bag or cover with a damp dish towel and let rise in a warm place for 45 minutes.
4) Preheat the oven to 425 F. To mae the topping, beat the egg yolk with milk and sugar in a bowl and brush it over the top of the loaf. Score the top and sprinkle with the orange peel. Bake for 25-30 minutes, until golden brown. Turn out onto a wire rack to cool.
Overall, this bread was not to my taste and I do not anticipate making it again. I give it 2 out of 5 stars. People at work enjoyed it but it basically tasted like plain bread with marmalade inside of it. If you are a huge marmalade lover...you may love this recipe and you can disregard my comments about this recipe. This may be the bread for you. However apparently, I don't like marmalade that much. It is too sweet and orangey. (I know it isn't a word but it should be.) In addition, the bread itself tasted like a plain white bread. It was nothing special. A plain white bread after all of the waiting and work.....so not worth it. I had to wait over two hours for this bread to rise. Mind you, I watched TV and ran during this time and was not lacking in entertainment. But the bread did stop me from going out on the town. My last note about this bread is that maybe it would have been better if I had access to the candied orange peel that this recipe calls for. I was unable to find this ingredient at the store and thus decided to make the recipe without it.
Wednesday, September 16, 2009
Cinnamon-Raisin Bread
This recipe makes 2 loaves
Ingredients
For the dough
1 envelope (1/4 ounce) active dry yeast
2 cups warm milk (about 110 F)
2 pounds 2 ounces flour (about 6 1/2 cups), plus more for dusting
1 stick unsalted butter, room temperature, plus more for pans
1/2 cup sugar
2 large eggs, plus 1 large egg, lightly beaten
2 1/2 teaspoons coarse salt
1 cup raisins
1 tablespoon ground cinnamon
Vegetable oil, for bowl and plastic wrap
For the filling
1 1/2 cups sugar
2 tablespoons ground cinnamon
Directions
1) Make the dough: In the bowl of an electric mixer, sprinkle the east over the warm milk; whisk to combine. Add the flour, butter, sugar, 2 eggs, and salt. Attach bowl to mixer fitted with the dough hook. Mix on low speeds until all the ingredients are well combined, about 3 minutes. Raise the speed to medium-low, and continue to mix until the dough is uniformly smooth and pulls away from the sides of the bowl, about 3 minutes more.
2) Turn out dough onto a lightly floured work surface. Pat out dough into a 9-inch round, about 1 1/4 inch thick. Sprinkle with raisins and cinnamon, and knead until they are just incorporated. Place the dough in a lightly oiled bowl, and cover with plastic wrap; let rise in a warm place until doubled in bulk, about 1 hour.
3) Return the dough to a lightly floured work surface, and pat into a round. Fold in the following manner: Fold the bottom third of the dough up, the top third down, and the right and left sides over, tapping the dough after each fold to release excess flour, and pressing down to seal. Return the dough to the bowl, seam side down, and let rise again until doubled in bulk, about 40 minutes.
4) Make the filling: Combine sugar and cinnamon with 2 tablespoons water in a small bowl. Return the dough to a lightly floured work surface, and divide in half. Roll out one half to a 12-by10- inch rectangle; brush with beaten egg, and sprinkle with half the filling. Repeat with the remaining dough and filling.
5) Generously butter two 9-by 5-inch loaf pans; set aside. With a short end of the rectangle towards you, fold in both long sides of the dough, about 1 inch. Then roll the dough towards you, gently pressing as you go to form a tight log. Gently roll the log back and forth to seal the seam. Place the loaf in a prepared pan, seam side down. Repeat with remaining rectangle. Cover pans loosely with oiled plastic wrap, and let rest in a warm place until dough rises just above the rim of the pan, about 30 minutes. Meanwhile, preheat oven to 425 F.
6) Brush the tops of the loaves with beaten egg and transfer pans to a parchment lined baking sheet. Bake, rotating pans halfway through, until loaves are golden brown, about 45 minutes. (If the tops begin to brown too quickly, tent with aluminum foil.) Turn out bread onto wire rack to cool completely before slicing. The bread can be kept, wrapped in plastic, at room temperature up to 4 days.
My first comment about this recipe is that it took a lot longer than I anticipated. I need to read more carefully ahead of time. The recipe took about 4 hours to make. Mind you, I was not continuously a slave to the kitchen during this time. I spent a lot of time during the recipe waiting for the bread to rise. Actually there was a little over 2 hours of waiting for bread to rise.
Next, after placing the bread in the oven there is a little comment in the directions about "tenting" the bread with aluminum foil. I would highly advise this. The bread is suppose to take 45 minutes. At 20 minutes, I checked on the bread to flip it in the oven and there was a large amount of smoke emanating from the tops of the loaves. The loaves turned a little brown on top. I immediately took out the loaves thinking there was no way that I could have overcooked the loaves. They were only in the oven 20 minutes!! I promptly tented my loaves with foil and then watched the bread like a hawk.
Overall, I give this bread 5 out of 5 stars. I definitely plan on making the bread again. Wow! Sugar dripped from the inner circle of the bread as I consumed it for breakfast. It is a perfect breakfast and a great treat. Thanks Martha for another awesome recipe!
Sunday, September 13, 2009
Apple Crisp
Ingredients:
5 apples, sliced and peeled
1 cup brown sugar
3/4 cup oats
3/4 cup flour
1 tsp. cinnamon
1 tsp. nutmeg
1/2 cup butter, softened
1/4 cup apple juice or water
Directions:
Preheat oven to 375 F. Place half the apples in an oiled 9- x 9- inch pan. Blend together remaining ingredients, except juice, and crumble half the flour mixture over the apples. Cover with remaining apples and flour mixture. Pour juice over top. Bake 35 minutes.
Overall, I give this recipe 3 out of 5 stars. It is not the awesome cooks in the kitchen what lead me to this particular rating. : ) The apple crisp just wasn't right. The texture wasn't what I expected. I expected more of an apple pie taste with a crumbly top. However, the apple crisp was more bland and soft. I wanted it to be crunchier...like the crisp in its name. I don't know what I can do to improve it but I will let you guys know. My friend who baked with me was not as critical on the recipe and commented that she thought it was good.
Saturday, September 12, 2009
Lemon-Cream Cheese Cupcakes
Ingredients
1 pkg (2-layer size) white cake mix
1 pkg (4 serving size) Jell-O Lemon Flavor Instant Pudding and Pie Filling
1 cup water
4 egg whites
2 Tbsp oil
1 pkg (16 oz) powdered sugar
1 pkg (8 oz) Philadelphia Cream Cheese, softened
1/4 cup butter, softened
2 Tbsp, lemon juice
Directions
1) Preheat oven to 350 F. Beat cake mix, dry pudding mix, water, egg whites and oil in large bowl with electric mixer on low speed until moistened. Beat on medium speed 2 min. Spoon batter evenly into 24 paperlined 2 1/2-inch muffin cups.
2) Bake 21 to 24 min, or until wooden toothpick inserted in centers comes out clean. Cool in pans 10 min., remove to wire racks. Cool completely.
3) Meanwhile, beat sugar, cream cheese, butter and juice with electric mixer on low speed until well blended. Frost cupcakes.
Makes 24 servings, 1 cupcake each.
Jazz It Up: Stir 1 tsp, grated lemon peel into frosting mixture. Garnish with additional grated peel.
My first comment about this baking experience is that I want a Kitchen Aid Mixer. Wow! This was my first time using one and it was so awesome. Second, be patient. We were really patient to ice these cupcakes (as in we left the house for 4 hours to drink wine and then returned) and the icing turned out great in turn. This also may be because my friend iced them instead of myself. I am not going to lie. I truly lack a gift in icing. However, I hope to hone in on this skill soon.
Overall, I had a great time making these cupcakes with my friend. I would give them 3.5 out of 5 stars. They were easy to make and very moist. They were quite good. I would consider them a solid potential choice for future cupcakes in a hurry to make.
Wednesday, September 9, 2009
Chicken, Red Grape, and Pesto Pizza
Ingredients
1 (11-ounce) can refrigerated thin-crust pizza dough
Cooking spray
1/3 cup refrigerated pesto
1 1/2 cups seedless red grapes, halved
8 ounces shredded skinless, boneless rotisserie chicken breast
3 garlic cloves, thinly sliced
4 ounces fresh mozzarella cheese, thinly sliced
3 tablespoons grated Romano cheese
1/4 teaspoon black pepper
1/4 cup sliced green onions
Directions
1. Preheat oven to 425 F.
2. On a lightly floured surface, pat dough into a 12-inch circle; gently place dough on a pizza pan coated with cooking spray. Spread pesto evenly over dough, leaving a 1/2-inch border around edges. Arrange grapes evenly over dough; top evenly with chicken. Top with garlic and mozzarella; sprinkle with Romano and pepper. Bake at 425 F for 20 minutes or until crust is golden brown. Sprinkle with onions. Cut into 12 wedges. Yield: 6 servings (serving size: 2 wedges) Calories: 364 per serving
Overall, this pizza turned out really good. I loved the tomato pesto sauce that my mom bought to go on this pizza. It was a pleasant (and much welcomed) addition to the recipe. My main complaints are as follows: The dough was a little watery and the pizza cooked a lot faster than I anticipated. The water I believe came from the grapes which seeped fluid while cooking. I don't think I could have prevented this. I loved eating with chicken with grapes. Although it sounded like a strange combination when I first read the recipe. Despite these two complaints, I was pleasantly surprised with how easy it was to make pizza and plan on making pizza again in the near future. I give this recipe 4 out of 5 stars. : )
Tuesday, September 8, 2009
Shortbread Fingers
Ingredients
3 sticks unsalted butter, room temperature, plus more for pan
2 1/2 cups all-purpose flour
1/4 teaspoon salt
3/4 cup plus 2 tablespoons confectioners' sugar
Granulated sugar, for sprinkling
Directions:
1) Preheat the oven to 325 F. Butter a 12-by-8-inch rimmed baing sheet and line with parchment paper, leaving a 1-inch overhang on long sides. Whisk together flour and salt in a small bowl; set aside.
2) In the bowl of an electric mixer fitted with the paddle attachment, beat butter until fluffy on medium speed, 3 to 4 minutes. Add confectioners' sugar; continue to beat until very light and fluffy, about 2 minutes, scraping down the sides occasionally, until just incorporated. (It should have the consistency of soft cookie dough.)
3) Using a small offset spatula, evenly spread dough in prepared baking sheet. Chill in the freezer or refrigerator until dough is firm, about 15 minutes.
4) Prick dough all over with a fork. Bake, rotating sheet halfway through, until shortbread is golden brown, 40 to 45 minutes. Transfer to a wire rack and immediately sprinkle with granulated sugar. While still hot, use a large knife to cut shortbread into 4-by-1 inch pieces. Cool completely in the pan. Shortbread can be kept in an airtight container at room temperature for up to 1 week.
Monday, September 7, 2009
Banana-Caramel Cake
Making the Cake:
Ingredients
1 1/4 cups heavy cream
This recipe is quite labor intensive. It took us a little under four hours to make. However, it turned out to be a keeper and the cake was quite good, 4.5 out of 5 stars. My favorite part about the cake was the caramelized banana middle layer. It is not something you normally expect but it has the right amount of sweetness to really accentuate the cake well. The most difficult part of the recipe (in my humble opinion) was making the caramel sauce. The sauce is requires a great deal of stirring and became quite clumpy and stiff when we added the cream was first added to the sugar. It may be just easier to sprinkle premade caramel on the top for decoration. : ) All in all, I recommend making this recipe sometime...just make sure you have a lot of time.
PS In the pictures above, you can clearly see a nice icing job. I do not take credit for this. This was my friend's handy work. I probably needed to watch her more closely to try to learn some about icing. : )