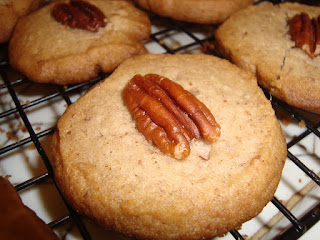
This is the second set of cookies that I made for the Dining For Woman cookie exchange that we have every December. (http://www.diningforwomen.org/) I had a bag of pecans lying around...so a cookie recipe with pecans seemed appropriate. Plus for my birthday, I recently received a food processor. This was the perfect opportunity to bust it out and use it. The new food processor is just so shiny and awesome. No longer do I have to grind nuts in my recipes with a coffee grinder. This is an exciting development for me in life. I choose this Pecan Sandies recipe out of the book Baking Illustrated. Enjoy!
Ingredients
1 1/2 cups pecan halves, plus about 32 pecan halves for pressing onto unbaked cookies
1/4 cup confectioner's sugar
1/2 cup packed light brown sugar
1 1/2 cups unbleached all-purpose flour
1/4 teaspoon salt
12 tablespoons (1 1/2 sticks) cold unsalted butter cut into 1/2 inch cubes
1 large egg yolk
Instructions
1) In a food processor, process 1 1/2 cups pecans with both sugars until nuts are ground, about twenty 1 second pulses. Add the flour and salt and process to combine, about twelve 1 second pulses. Scatter the butter pieces over the dry ingredients and process until the mixture resembles damp sand and rides up the sides of the bowl, about eighteen 1 second pulses. With the machine running, add the yolk and process until the dough comes together into a rough ball, about 20 seconds.
2. Turn the dough (it will look scrappy and uneven) onto a clean, dry work surface and gently knead until it is evenly moistened and cohesive. Using the palms of your hands, roll the dough into an even 12-inch log, cut the log in half with a chef's knife, and wrap each half in plastic wrap. Freeze the dough logs until very cold but still malleable, about 30 minutes. Remove them from the freezer, unwrap them, and toll them on the work surface to round off the flat sides. Rewrap the logs in plastic wrap and refrigerate them until thoroughly chilled and completely firm, about 2 hours.
3. Adjust the oven racks to the upper- and lower-middle positions and heat the oven to 325 degrees. Line 2 large baking sheets with parchment paper or spray them with nonstick cooking spray. Unwrap the dough logs and using a sharp chef's knife, slice the logs into coins 1/4 inch thick, slightly rotating the logs after each slice so that they do not develop a markedly flat slide. Place t slices on the prepared baking sheets, spacing them about 3/4 inch apart. Press a pecan half in the center of each slice.
4. Bake until the edges of the cookies are golden brown, about 24 minutes, rotating the baking sheets front to back and top to bottom halfway through the baking time. Cool the cookies 3 minutes on the baking sheets, then transfer them to a wire rack with a wide metal spatula and let cool to room temperature.
People have made some comments to me that I always make mistakes while baking. This isn't necessarily true...but I am very open and honest with you guys about things I could do to improve in both efficiency of the recipe and taste. I love finding ways to improve myself and my baking. So if you have any comments on the above things, please let me know. This being said....I will begin my critique of this recipe.
The recipe calls for basically the whole recipe to be made in the food processor. Now, I love my new food processor/baby but it wasn't big enough to hold all of the dough for the recipe. I discovered this as I made the recipe. I had to take out dough and place it in a separate bowl and mix the remaining dough in the food processor. Then, I exchanged the unmixed dough for mixed dough in the processor and repeated the process until everything was mixed. If I had not had trouble with the size of my food processor, the dough would have actually been created within 10 minutes... yes the recipe is that easy!
Overall, I give these cookies 4 out of 5 stars. You have to like shortbread to like these cookies but they turned out quite good. Not too sweet, not to crisp. They crumble in your fingers as you eat them, but melt in your mouth. I will definitely make them again.
Sunday, December 13, 2009
Saturday, December 12, 2009
Macadamia Butter Cookies
This is one of two cookies that I made for our 2nd Annual Dining For Women Cookie Exchange. Last year the Cookie Exchange was such a success that it was decided that we would do it again this year. I picked this Macadamia Butter Cookie recipe from the December 2009 Cooking Light Magazine. Why this cookie? They looked good simply put. Here's the recipe:
Ingredients
2/3 cup macadamia nuts
1/2 cup granulated sugar
1/2 cup packed light brown sugar
1 teaspoon vanilla extract
1 large egg
1 1/4 cups all-purpose flour
1/2 teaspoon baking soda
1/4 teaspoon salt
1/8 teaspoon ground nutmeg
1/2 cup sweetened dried cranberries, chopped
1 tablespoon granulated sugar
Directions:
1. Preheat oven to 375 F.
2. Place nuts in a food processor; process until smooth (about 2 minutes), scraping sides of bowl once. Combine macadamia butter, 1/2 cup granulated sugar and brown sugar in a large bowl; beat with a mixer at medium speed. Add vanilla and egg, beat well.
3. Weigh or lightly spoon flour into dry measuring cups; level with a knife. Combine flour, baking soda, salt and nutmeg, stirring with a whisk. Add flour mixture to sugar mixture; beat at low speed just until combine. Stir in cranberries. Chill 10 minutes.
4. Divide chilled dough into 30 equal portions; roll each portion into a ball. Place 1 tablespoon granulated sugar in a small bowl. Lightly press each ball into sugar; place each ball, sugar side up, on a baking sheet covered with parchment paper. Gently press the top of each cookie with a fork. Place 15 cookies on each of 2 baking sheets.
5. Bake cookies, 1 baking sheet at a time, at 375 F for 9 minutes or until golden. Remove cookies from pan, cool on a wire rack. Repeat procedure with remaining cookies.
Recipe is from December 2009 Cooking Light
I love the Cookie Exchange. It is so much fun...getting recipes from other people's cookies and coming home with a box of cookies. How fun is that, right?
Anyways, I made this recipe with my brand new food processor. Woo Hoo! No more grinding nuts with my coffee grinder. I am moving up in the world. :) I specifically choose this recipe so that I would have the opportunity to grind. I wish my food processor was a bit larger for this recipe but it was sufficient especially when you compare it to no food processor at all. Overall, I enjoyed these cookies. You have to like macadamia nuts...really like macadamia nuts to like them. The cranberries are a nice addition to them as well. I give these cookies 3.75 out of 5 stars. I wish they were softer and easier to to break apart. They were a bit crunchy and I wish I could bend them apart instead of crack them apart. I will definitely consider making these cookies again. I am not sure what I can do to improve them. Any suggestions?
Thursday, December 10, 2009
Sour Cream Fudge Layer Cake
One of my friend's husband is in Iraq right now. However, he has been in town for the past week for his vacation. This being said, his birthday is later this month and his wife decided to have a gathering and asked me to bring the cake. I love baking cakes as you all know by now...so this wasn't an unreasonable request. I picked a Sour Cream Fudge Layer Cake recipe out of Baking Illustrated because I wanted to make a different kind of chocolate cake. Making this cake was an adventure lest I say. The picture below might say to you what kind of adventure I had. :)
Sour Cream Fudge Cake
1 1/4 cups unbleached all purpose flour
1 cup non-alkalized cocoa
2 teaspoons instant espresso or coffee powder
1 cup boiling water
1/2 cup sour cream
2 teaspoons vanilla extract
16 tablespoons (2 sticks) unsalted butter, softened
1 3/4 cups sugar
2 large eggs, at room temperature
3/4 teaspoon baking soda
1/2 teaspoon salt
Chocolate Butter Icing
9 ounces bittersweet or semisweet chocolate, chopped
8 tablespoons (1 stick) unsalted butter
1/3 cup light corn syrup
1. For the cake: Adjust an oven rack to the middle position and heat the oven to 350. Generously grease two 9-inch round cake pans and cover the plan bottoms with rounds of parchment paper or waxed paper. Grease the parchment rounds and dust the pan with flour, tapping out the excess.
2. Mix the cocoa and instant expresso powder in a small bowl; add the boiling water and mix until smooth. Cool to room temperature, then stir in the sour cream and vanilla.
3. Beat the butter in the bowl of a standing mixer at medium speed until smooth and shiny, about 30 seconds. Gradually sprinkle in the sugar; beat until the mixture is fluffy and almost white, 3 to 5 minutes. Add the eggs 1 at a time, beating 1 full minute after each addition.
4. Whisk the flour, baking soda, and salt in a medium bowl. With the mixer at the lowest speed, add about a third of the dry ingredients to the batter, followed immediately by about a third of the cocoa mixture; mix until the ingredients are almost incorporated into the batter. Repeat the process twice more. When the batter appears blended, stop the mixer and scrape the sides of the bowl with a rubber spatula. Return the mixer to low speed; beat until the batter looks satiny, about 15 seconds longer.
5. Divide the batter evenly between the pans. With a rubber spatula, spread the batter to the pan sides and smooth the tops. Bake the cakes until they feel firm in the center when lightly pressed and a toothpick or thin skewer comes out clean or with just a crumb or two adhering, 23 to 30 minutes. Transfer pans to wire racks; cool for 10 minutes. Run a knife around the perimeter of each pan, invert the cakes onto the racks, and peel off the paper liners. Reinvert the cakes onto additional racks; cool completely before frosting.
6. For the icing: Melt the chocolate and butter in a medium bowl set over a pan of almost simmering water. Stir in the corn syrup. Set the bowl of chocolate mixture over a larger bowl of ice water, stirring occasionally, until the icing is just thick enough to spread.
So I am not going to lie, I had trouble making this cake. I tried twice. Now the cake seemed to be going great each time. I had no trouble mixing it and placing it in my awesome William Sonoma Cake pans. Everything seemed to be going great. Then as I baked it, it sank some. Then the real problem came when it was time to flip it. What a disaster! However, the cake did taste good. Next time, I think I will make this cake a sheet cake. I give this cake 3.5 out 5 stars....merely because of my inability to flip it.
Subscribe to:
Posts (Atom)